ML Compute 是 MacOS 11 Big Sur 里新加入的机器学习加速引擎,可以提升神经网络的训练和预测速度。
同时苹果官方也提供了支持ML Compute的优化版本Tensorflow来利用这一特性。源码已经在github上开源提供。
提前准备
使用该特性前,需要先确保MacBook已经升级到最新版本(MacOS 11.0+),同时确保python升级到3.8版本。
python升级到3.8版本后,需要为tensorflow_mac创建一个虚拟环境(venv),执行命令
python3.8 -m venv tensorflow_macos
即可,该命令会创建一个名为tensorflow_macos的python3.8 虚拟环境,同时也会创建一个名为tensorflow_macos的目录,后面tensorflow_macos会安装在这个目录内的虚拟环境中。使用
cd tensorflow_macos
命令进入该目录,同时执行
pwd
展示该目录的完整路径,下面安装时会用到。
安装
接下来就可以开始安装 tensorflow_macos 了,安装方式为直接在系统里执行以下远程安装脚本:
/bin/bash -c "$(curl -fsSL https://raw.githubusercontent.com/apple/tensorflow_macos/master/scripts/download_and_install.sh)"安装文件约316M,需要等待一段时间下载。
中间脚本会询问安装到哪个虚拟环境(Path to new or existing virtual environment [default: /Users/***/tensorflow_macos_venv/]:),此时提供刚刚创建好的虚拟环境的完整路径即可。
接下来安装脚本会在虚拟环境中安装 tensorflow_macos 以及依赖的包。最后会提示你使用
. /path/to/tensorflow_macos/bin/activate
来激活tensorflow_macos的虚拟环境(注意:以上命令仅为实例,需要根据实际的虚拟环境目录来调整)
测试
pip install tensorflow_datasets
使用tensorflow官方提供的训练脚本
#Import mlcompute module to use the optional set_mlc_device API for device selection with ML Compute.
from tensorflow.python.compiler.mlcompute import mlcompute
#Select CPU device.
mlcompute.set_mlc_device(device_name='cpu') # Available options are 'cpu', 'gpu', and ‘any'.

import tensorflow.compat.v2 as tf
import tensorflow_datasets as tfds

tf.enable_v2_behavior()

(ds_train, ds_test), ds_info = tfds.load(
'mnist',
split=['train', 'test'],
shuffle_files=True,
as_supervised=True,
with_info=True,
)

def normalize_img(image, label):
    """Normalizes images: uint8 -> float32."""
    return tf.cast(image, tf.float32) / 255., label

ds_train = ds_train.map(
normalize_img, num_parallel_calls=tf.data.experimental.AUTOTUNE)
ds_train = ds_train.cache()
ds_train = ds_train.shuffle(ds_info.splits['train'].num_examples)
ds_train = ds_train.batch(128)
ds_train = ds_train.prefetch(tf.data.experimental.AUTOTUNE)
s_test = ds_test.map(
normalize_img, num_parallel_calls=tf.data.experimental.AUTOTUNE)
ds_test = ds_test.batch(128)
ds_test = ds_test.cache()
ds_test = ds_test.prefetch(tf.data.experimental.AUTOTUNE)
model = tf.keras.models.Sequential([
tf.keras.layers.Flatten(input_shape=(28, 28, 1)),
tf.keras.layers.Dense(128,activation='relu'),
tf.keras.layers.Dense(10, activation='softmax')
])
model.compile(
loss='sparse_categorical_crossentropy',
optimizer=tf.keras.optimizers.Adam(0.001),
metrics=['accuracy'],
)
model.fit(
ds_train,
epochs=50,
validation_data=ds_test,
)
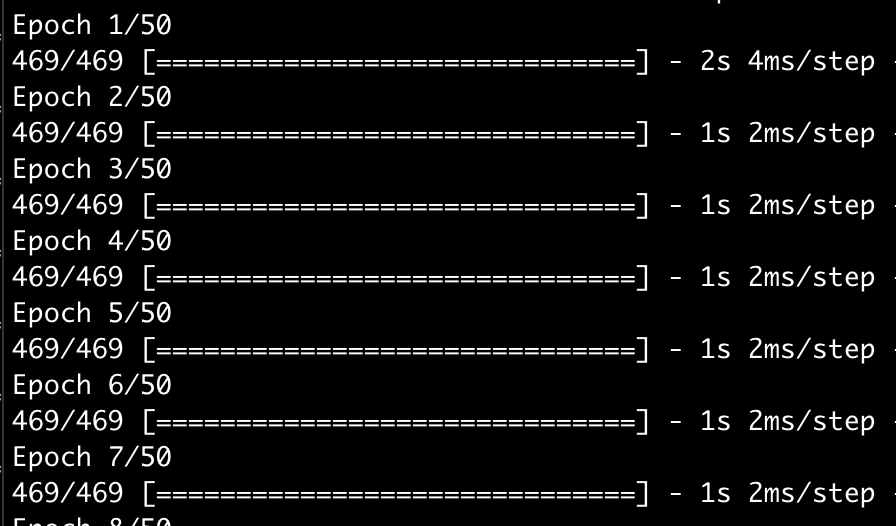
在使用普通tensorflow时,训练速度大概是 2ms/step
使用优化后的tensorflow,训练速度大概是 3ms/step

启用GPU后(Intel Iris Graphics 540 1536 MB),训练速度是 32ms/step
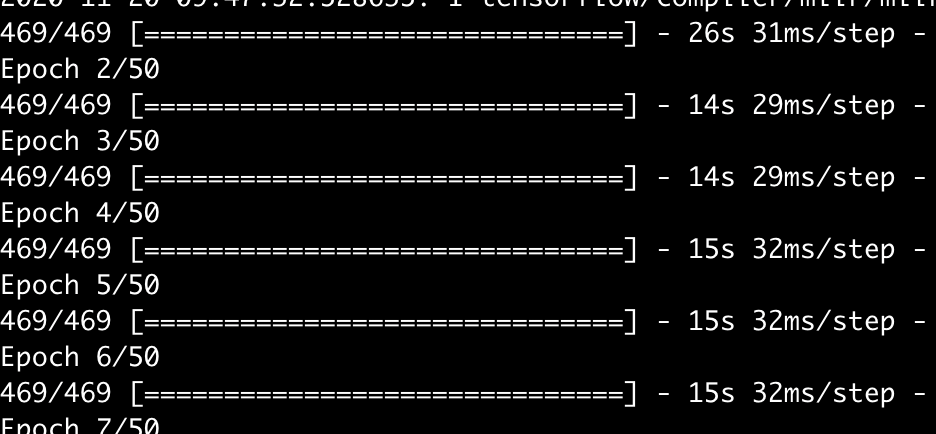
看来对于普通的MacBook,tensorflow_macos并不能带来速度上的提升,反而是更加拖后腿
至于M1芯片的效率,稍后测试
你好,设备切换成cpu跑的时候会报错 segmentation fault:11,请问有人遇到过吗 ? Mac-mini (Intel)